


Drywall textures can transform the appearance of your home’s interior, adding character and depth to any room. Among the myriad of options, the imperfect smooth drywall texture stands out for its unique blend of subtle sophistication and understated elegance. If you’re considering adding texture to your walls, or simply yearning to learn more about drywall finishes, this comprehensive guide is for you. We'll unravel the nuances of imperfect smooth drywall texture, exploring its history, benefits, and application methods.
Understanding Imperfect Smooth Drywall Texture
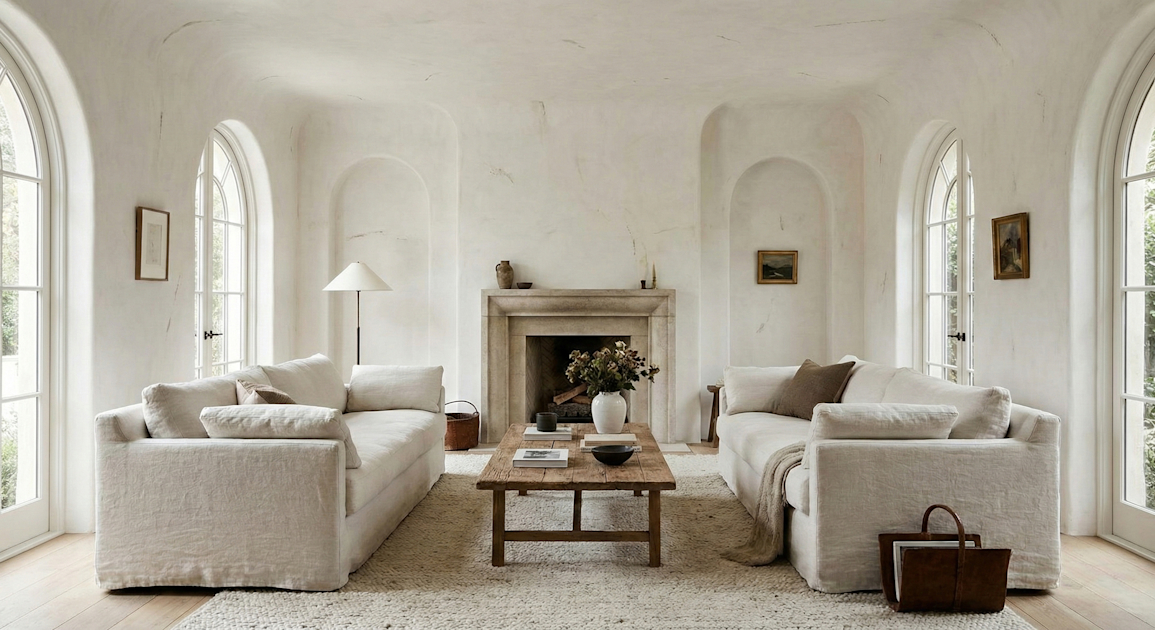
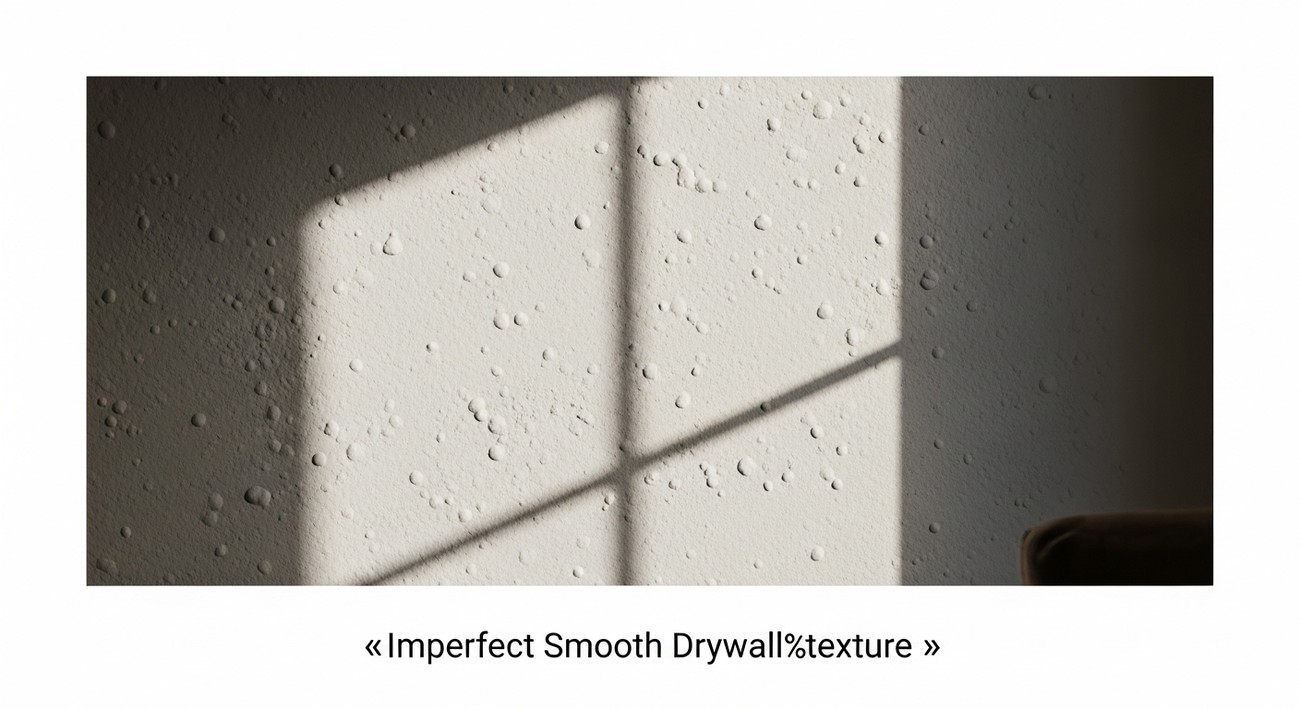
Imperfect smooth drywall texture is a decorative treatment for drywall that features a mostly smooth surface with slight, random imperfections. Unlike the perfectly polished flat surface, these intentional irregularities create a sense of movement and artistry, offering a more organic feel. Its understated beauty makes it an increasingly popular choice among homeowners and interior designers alike.
History and Evolution
The imperfect smooth drywall texture has its roots embedded in traditional plastering techniques. Originating from the days when walls were hand-finished with plaster, this texture mimics the uneven yet charming aesthetics of old-world craftsmanship. As drywall became the norm in modern construction for its ease of installation and cost-effectiveness, textures such as imperfect smooth emerged to bring back that touch of artisanal quality.
Benefits of Imperfect Smooth Drywall Texture
Choosing the right drywall texture can significantly impact your space. Here are some compelling reasons why the imperfect smooth drywall texture might be the perfect fit for your home:
Versatile Aesthetic: The subtle imperfections lend a dynamic quality to a room, complementing both contemporary and traditional décor styles.
Light Diffusion: The texture’s slight variances in depth can help diffuse light, reducing glare and softening shadows for a more comforting ambiance.
Conceals Imperfections: While it may sound paradoxical, this texture can effectively mask minor wall imperfections, making it a pragmatic choice for older homes.
Easy Maintenance: The texture is durable, and minor repairs can be managed without altering the overall aesthetics of the wall.
How to Apply Imperfect Smooth Drywall Texture
Creating an imperfect smooth drywall texture might seem like a daunting task, but with the right tools and preparation, it becomes a manageable and rewarding endeavor. Here’s a step-by-step guide to help you achieve this beautiful finish.
Materials and Tools Required
Before starting, gather the following materials and tools for a smoother process:
- Joint compound
- Wide drywall knife
- Trowel
- Sandpaper (medium to fine grit)
- Primer
- Paint (if desired)
Step-by-Step Application
Preparation: Ensure the drywall surface is clean, dust-free, and sealed with a coat of primer. This prepares the surface for better adherence of the joint compound.
First Coat Application: Using a wide drywall knife or trowel, apply a thin layer of joint compound, covering the entire wall. Don’t worry about slight ridges or bumps.
Create Texture: While the compound is still wet, use a trowel to create random, slight peaks and valleys across the surface. The aim is not uniformity, so embrace the irregularities.
Waiting Period: Allow the joint compound to dry thoroughly. This could take anywhere from 24 to 48 hours depending on your environment.
Sanding: Once dry, use medium to fine-grit sandpaper to soften the peaks and create your desired level of smoothness. Remember, the goal is to have an “imperfect” yet smooth appearance.
Finishing Touches: After sanding, wipe the wall down with a damp cloth to remove dust. Apply a coat of primer followed by your choice of paint color to seal and finish the texture.
Picking the Perfect Paint
Choosing the right paint can elevate the allure of your imperfect smooth drywall texture. Here are some factors to consider:
Sheen: Opt for a matte or satin finish to enhance the subtle texture details without overpowering them.
Color: Neutral tones often accentuate the organic quality of imperfect smooth textures, while bold colors can add dramatic flair.
Maintenance Tips for Imperfect Smooth Drywall
Maintaining the beauty of your textured walls is key to preserving their aesthetic value. Here’s how you can keep them looking their best:
Regular Dusting: Use a feather duster or microfiber cloth to gently remove dust particles from the surface.
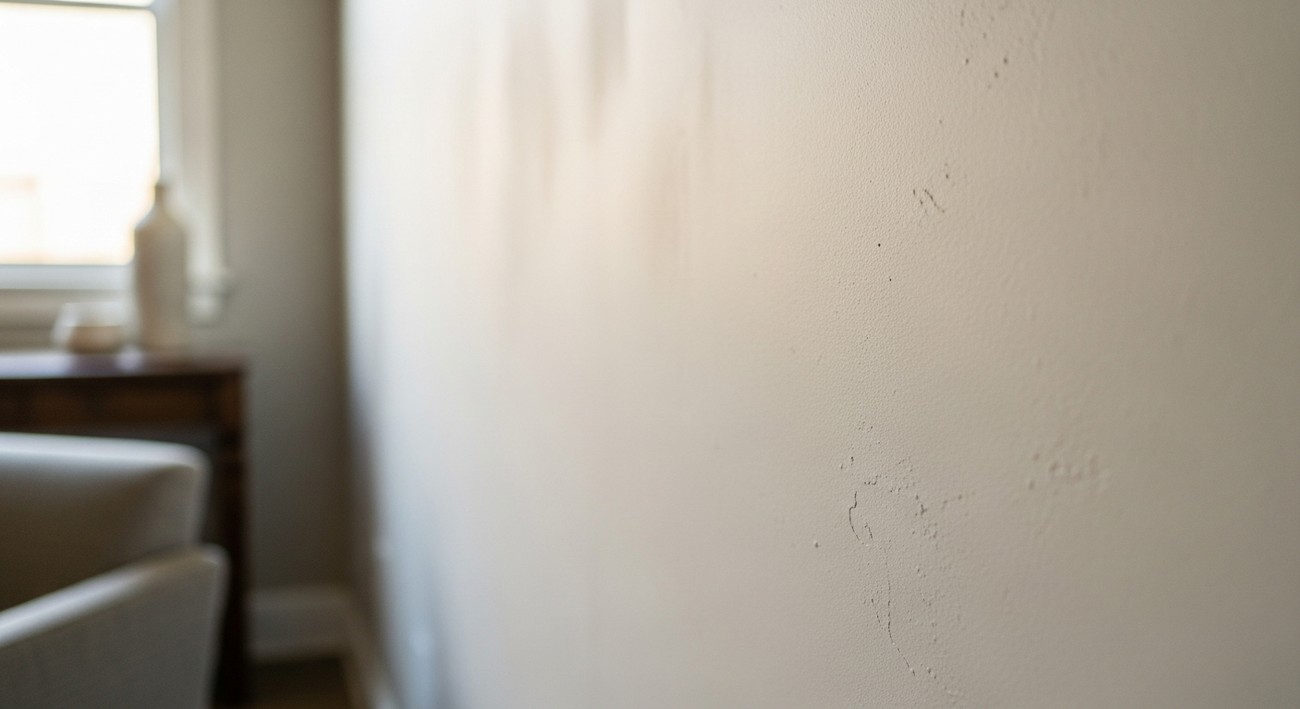
Prompt Repairs: Address any chips or cracks promptly with touch-up compound to prevent them from expanding.
Routinely Check for Moisture: Moisture can be detrimental to drywall textures. Ensure your space is well-ventilated, particularly in humid or wet areas like bathrooms or kitchens.
Frequently Asked Questions About Imperfect Smooth Drywall Texture
Why choose an imperfect smooth drywall texture for your home?
An imperfect smooth drywall texture offers a unique aesthetic that artfully blends classic and modern styles, making it a popular choice for homeowners looking to add personality to their walls. This technique involves creating a smooth surface that is not entirely flat but has subtle variations and character. It can enhance the visual appeal of your interiors by offering a distinctive look that is both subtle and sophisticated, often adding a minimalist charm to any room.
How does imperfect smooth drywall texture differ from other wall textures?
Imperfect smooth drywall texture stands out from other textures like knockdown, orange peel, or skip trowel, primarily due to its subtlety. While many textures add pronounced patterns or designs to the wall surface, imperfect smooth texture uses minimalism as its focal point. The result is a nearly slick finished wall that may have slight imperfections or variances in smoothness. These minor deviations are intentional, giving each wall a unique character and helping avoid the sterile and overly uniform appearance that some other methods might produce.
What should you consider before applying imperfect smooth drywall texture?
Before committing to an imperfect smooth drywall texture, it's essential to consider a few key factors. First, assess your existing wall condition; this technique works best on walls that are already relatively flat and free of significant blemishes. Also, consider the lighting in your room. Since this texture can highlight imperfections, ensure that your lighting complements rather than accentuates these features in a negative way. Lastly, consider your design goals. If you're aiming for a modern and elegant aesthetic with just a hint of character, this texture is an ideal choice.
Can you DIY imperfect smooth drywall texture, or should you hire a professional?
While some DIY enthusiasts might feel up to the challenge of applying imperfect smooth drywall texture, seeking professional help often ensures more satisfactory results. Professionals have the skills and tools necessary to achieve the perfect balance of smoothness and imperfection that characterizes this texture. If you decide to DIY, be prepared for a learning curve, as achieving the desired look requires careful attention to detail, patience, and the correct materials. A professional, however, can deliver consistent and high-quality outcomes more efficiently.
How do you maintain imperfect smooth drywall texture?
Maintaining an imperfect smooth drywall texture involves regular dusting and occasional cleaning to keep the walls looking pristine. Use a soft cloth or duster to remove dust gently, and if cleaning becomes necessary, opt for a mild detergent mixed with water. Avoid abrasive cleaners or brushes, as they could damage the surface. It's also crucial to address any chips or scratches quickly by lightly sanding the affected area and retouching it with matching paint, preserving the texture's aesthetic integrity.
Does imperfect smooth drywall texture work well with open floor plans?
Yes, imperfect smooth drywall texture complements open floor plans beautifully by creating a cohesive and unified look across broad spaces. Its understated elegance provides a seamless transition from room to room while adding depth and character without overwhelming the eye. This texture helps to define spaces subtly without the need for bold visual breaks, making it a perfect fit for open and airy layouts. The smooth, yet imperfect finish adds a refined touch, enhancing modern and contemporary designs often found in open floor plans.
Is it cost-effective to install an imperfect smooth drywall texture?
The cost-effectiveness of installing an imperfect smooth drywall texture depends on several factors, including the size of the area you're covering and whether you hire a professional or tackle it yourself. Generally, it can be more expensive than basic textures like orange peel or knockdown due to the skill and time required to achieve the desired smoothness. Hiring a professional may increase upfront costs, but it can ensure high-quality results and potentially save on future repairs or refinishing. Additionally, this texture may increase your home's value by providing a more sophisticated, high-end look.
Step-by-Step Guide
Tools and Materials Needed
- Joint compound (pre-mixed or in powder form)
- Large drywall knife or trowel (12-inch or larger)
- Medium drywall knife or spatula (6-inch)
- Sanding block or pole sander with fine-grit sandpaper (220 grit)
- Drywall primer
- Paint roller and paint tray
- Drop cloths or plastic sheeting
- Painter's tape
- Safety goggles and dust mask
- Ladder or step stool (if needed)
- Mixing bucket and drill with paddle mixer (for powder joint compound)
Preparation Steps
Clear and Protect Your Area: Ensure your room is clear of furniture or cover items with plastic sheeting or drop cloths. Lay down drop cloths to protect your floors.
Repair Wall Imperfections: Patch any holes or significant cracks with spackle or joint compound and allow them to dry. Sand these areas smooth and ensure they are flush with the wall surface.
Prime the Surface: Apply a coat of drywall primer to the wall. This ensures the joint compound adheres well. Let the primer dry completely before moving forward.
Detailed Instructions
Prepare the Joint Compound: If using powdered joint compound, mix it in a bucket with water using a paddle mixer until it's creamy without lumps. Pre-mixed compound might need slight stirring.
Apply the Compound: Beginning at one corner of the wall, use a large drywall knife to apply a thin layer of compound in sections. Work from the bottom up to prevent drips. Aim for a thickness of about 1/8 inch.
Create the Texture: While the compound is still wet, take a medium drywall knife and randomly skim the surface. Use varied pressure and knife angles to produce the 'imperfection.' Try cross-hatching in different directions for a subtle pattern that catches light differently.
Smooth and Soften: Allow the compound to set for about 15 to 30 minutes, checking for firmness. Lightly drag a clean knife over prominent ridges or peaks to soften them.
Let It Dry: Give the texture 24 hours to cure thoroughly. Ensure the room remains well-ventilated during this time to promote even drying.
Sand the Surface: Use fine-grit sandpaper to further smooth out the texture, diminishing any harsh peaks or ridges, but maintaining the characteristically uneven appearance. It's essential to wear a dust mask to avoid inhaling fine particles.
Prime and Seal the Texture: After sanding, wipe the surface with a damp cloth to remove dust. Once dry, apply another layer of primer to seal your work.
Paint the Wall: Choose your desired color and paint over the texture using regular painting techniques. A roller often works best on textured surfaces.
Tips for Success
- Consistent Pressure: Keep your tool pressure consistent for a more harmonious texture.
- Test Your Technique: Start practicing on a piece of scrap drywall to get a feel for angles and pressure before taking on your actual wall.
- Environment: A humidifier can slow drying times, allowing for adjustments if needed.
- Lighting: Under strong lighting, minor imperfections may become apparent, so check your work as you go, especially at different times of the day.
What to Do If Something Goes Wrong
- Too Rough Texture: If the texture is more pronounced than desired, sand it down more aggressively. If necessary, apply a thin final skim coat to modify heavy textures.
- Compound Cracking: This could be from drying too quickly or from too thick an application. Allow the compound to completely dry, then fill the cracks with more compound and smooth again.
- Uneven Surface: Sand down high spots and add compound to fill in low spots. Feather edges to blend.
Common Mistakes to Avoid
1. Inadequate Surface Preparation
Jumping straight into applying the drywall texture without properly prepping the surface is a common oversight. This mistake happens because we're often eager to get started or assume that the underlying surface isn't critical to the final result. However, poor surface preparation can lead to adhesion issues and uneven texture.
Avoid It: Always start by cleaning the drywall thoroughly, removing dust, and applying a primer. This ensures a smooth application of the texture and reduces the risk of future problems.
Already Made the Mistake?: If you notice the texture peeling or not adhering correctly, gently sand the area down and remove any dust. Reapply a primer and then retexture, taking care to blend it with the surrounding areas.
Expert Recommendation: Invest in a quality primer that's specifically designed for drywall to ensure optimal adhesion.
2. Using the Wrong Tools
Using inappropriate tools, like a small putty knife instead of a large trowel, can create inconsistent textures and make the job more difficult. This mistake often happens due to a lack of experience or because the right tools are simply not available.
Avoid It: Select your tools based on the texture pattern you’re attempting to achieve. A broad knife or trowel is ideal for most imperfect smooth textures, while specialized brushes and rollers can offer unique finishes.
Already Made the Mistake?: If you're unhappy with the texture, scrape it off before it dries completely or sand it down if it’s already set. Acquire the right tools and reapply the texture with consistent motions.
Expert Recommendation: Keep a variety of tools on hand and familiarize yourself with their uses to see what works best for your specific project.
3. Skipping the Test Application
Overconfident DIYers may skip the test application step and directly apply the texture to the entire wall, leading to undesirable finishes if unexpected issues arise. This happens mainly due to excitement or scheduling constraints.
Avoid It: Before treating an entire wall, always do a test application on a small, inconspicuous section to gauge how the texture looks and adheres.
Already Made the Mistake?: If the entire wall has an unsatisfactory texture, consider feathering out the texture with sandpaper or reapplying a new layer with adjustments based on your test results.
Expert Recommendation: Testing is crucial, particularly when working with new materials or techniques. Set aside time in your project plan for this critical step.
4. Misjudging Texture Thickness
Applying texture that's too thick or too thin is common, particularly for novices. This happens because it's challenging to estimate the correct consistency or because you're trying to rush the process.
Avoid It: Mix the texture compound to the recommended consistency and apply it in even coats. Start with a thinner application, as you can always build up additional layers if needed.
Already Made the Mistake?: If the texture is too thick, try sanding it down gently. If too thin, allow it to dry completely and apply another coat with a thicker consistency.
Expert Recommendation: Keep consistency charts handy and measure your mixtures carefully to prevent deviations in texture thickness.
5. Ignoring Drying Times
In the haste to finish a project quickly, many forget the importance of allowing each layer adequate time to dry. This oversight can lead to smudging, peeling, and inconsistencies in the final texture.
Avoid It: Follow the manufacturer's recommendations for drying times to the letter. Conditions like humidity and temperature will affect drying, so adjust as necessary.
Already Made the Mistake?: If impatience compromised your texture, let it dry completely, then sand it smooth and reapply where necessary.
Expert Recommendation: Allocate ample time for drying in your project schedule to ensure high-quality results. Using fans or heat can help expedite the process if needed.
6. Neglecting Safety Precautions
In the rush of drywall texturing, safety can sometimes fall by the wayside. This might happen due to a lack of knowledge or simply oversight.
Avoid It: Always wear protective gear such as masks, goggles, and gloves to safeguard against dust and chemical exposure.
Already Made the Mistake?: Prioritize safety immediately by adding necessary protections and consider consulting a professional if you suspect any adverse health effects.
Final Thoughts
Embracing an imperfect smooth drywall texture can transform your space, bringing a touch of character and warmth that perfectly complements your home’s aesthetic. Whether you're looking to refresh an existing room or starting a new project, incorporating this style offers a unique blend of sophistication and comfort, ideal for any homeowner in Sacramento, CA.
If you're ready to enhance your walls with this beautiful texture, we invite you to reach out to us at HouseIdea. Our team of experts is here to guide you through the process, ensuring you achieve the perfect look for your home. Contact us today to schedule a consultation or request a free estimate, and let’s make your vision a reality.
Tags: imperfect, smooth, drywall texture,


